Setup services on your VPS with Nginx and Docker
This article is a detailed explanation on how to reproduce the configuration I’ve made on my VPS to easily deploy services (such as a blog, a ctf platform, webapps etc.).
The VPS Architecture
The VPS is hosted by OVH and shipped with a nice Ubuntu Server.
What we are going to realize is this architecture :
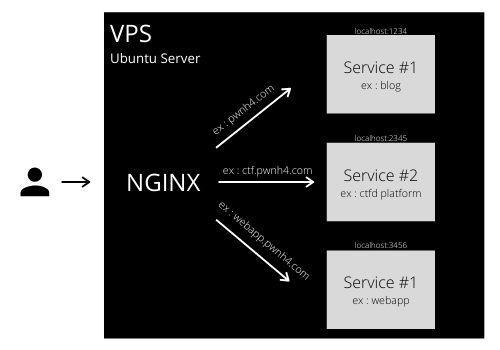
N.B the services described here are examples of what I could deploy, ctf.pwnh4 and webapp.pwnh4 may not be up when you read this
We can see here the VPS Ubuntu Server on which a nginx server is running. On the server, multiple dockers are running and expose different ports. The nginx server installed on the VPS plays the role of a reverse proxy by redirecting the incoming traffic to the correct service (ex : pwnh4.com is redirected to the Docker on which my blog is hosted). The nginx server also handles all the HTTPS certificates for the services.
Before starting any configuration on the vps, I modify the domain name pwnh4.com dns zone “A” field to the VPS IP address.
Setting up a service with Docker
In this part, I am going to show all the creation process of my blog Docker service.
I use Hugo, a fast static website generator written in Go. I recommend it as it is really easy to configure and has great performances.
I use a multi-stage Dockerfile described in this article to host my hugo blog on a nginx+alpine server. I let you check this article out to see more about the Dockerfile configuration.
This docker is then built run with :
docker build -t hugo
docker run -p 1234:80 hugo &
You can see that here I host my blog on localhost:1234.
Now that the service is up, we have to configure nginx to redirect the traffic targeting pwnh4.com to this docker and add an HTTPS certificate.
Nginx Configuration
First of all, install nginx :
apt-get update
apt-get install nginx
To reverse proxy to our blog service, we need to setup a virtual host for pwnh4.com.
To add a virtual host, we need to add a configuration file like this in /etc/nginx/sites-available :
server {
        listen          80;
        server_name     pwnh4.com;
        return          301 https://$server_name$request_uri;
}

server {
        listen          443 ssl;
        server_name     pwnh4.com;

        location / {
                proxy_pass              http://localhost:1234/;
                proxy_set_header        Host $host;
                proxy_set_header        X-Forwarder-For $proxy_add_x_forwarded_for;
                proxy_connect_timeout   10;
                proxy_send_timeout      10;
        }
}
In this configuration file, we simply tell nginx to redirect all requests targeting pwnh4.com to localhost:1234. We also add a redirection to force HTTPS (we will configure it in a moment).
Then we need to enable this new virtual host :
ln -s /etc/nginx/sites-available/pwnh4.com /etc/nginx/sites-enabled/pwnh4.com
We can now test this nginx setup and see if some errors show up :
nginx -t && nginx -s reload
Nginx doesn’t find any error, we can now setup the HTTPS.
Time to setup HTTPS with LetsEncrypt
LetsEncrypt is a free and automated Certificate Authority which makes it really convenient to use.
This organization provides a script that will automatically setup the certificate for us. So let’s install it and run it for our pwnh4.com service :
add-apt-repository ppa:certbot/certbot
apt-get update
apt-get install python-certbot-nginx
certbot --nginx -d pwnh4.com -d www.pwnh4.com
N.B. certbot is not fully functionnal with nginx servers. If the creation step fails, you’ll have to create a default virtualhost with this configuration :
$ cat /etc/nginx/sites-available/default

server {
   listen 80 default_server;
   server_name _;
   root /var/www/html;
        index index.html index.htm index.nginx-debian.html;
        location / {
                try_files $uri $uri/ =404;
        }
}
We can now see that the cerbot added some lines to our pwnh4.com virtualhost configuration :
server {
        listen          443 ssl;
        server_name     pwnh4.com;

        location / {
                proxy_pass              http://localhost:1234/;
                proxy_set_header        Host $host;
                proxy_set_header        X-Forwarder-For $proxy_add_x_forwarded_for;
                proxy_connect_timeout   10;
                proxy_send_timeout      10;
        }

    ssl_certificate /etc/letsencrypt/live/pwnh4.com/fullchain.pem; # managed by Certbot
    ssl_certificate_key /etc/letsencrypt/live/pwnh4.com/privkey.pem; # managed by Certbot
}
A nice trick to not have to handle the certificate renewal every 90 days is to add a crontab job which checks every day if the certificates you have need to be updated and update them if necessary :
0 12 * * * /usr/bin/certbot renew >> /var/log/letsencrypt/renewal.log
We can now successfully access our Hugo blog through HTTPS via pwnh4.com ! If we want to add another service, we just have to follow those steps. For example with the webapp.pwnh4.com described in the Architecture schema :
* build and run the docker container and root its 80 port to 3456
* create a new nginx virtualhost for webapp.pwnh4.com and redirect https traffic to localhost:3456
* run certbot to deliver a certificate for webapp.pwnh4.com
* enjoy !
After that ?
A nice way to improve this workflow would be to automate services deployment with Gitlab CI/CD for example. It would be amazing to just push a new Dockerfile and see it automatically built, run and HTTPS certified ! If you have any advice / useful resources on that, please contact me !